Cleaning a home can feel unnecessarily expensive when every aisle offers a different bottle for a slightly different “problem,” and the total keeps climbing with each refill.
With a few basic ingredients and some clear safety rules, diy cleaning products on budget can cover most everyday messes without turning your cupboard into a chemistry lab.
Simple recipes work best when you treat them as gentle, practical helpers rather than miracle solutions that do everything instantly, because realistic expectations keep you safe and satisfied.
What DIY cleaners can do well, and where store-bought matters
Everyday cleaning is mostly about removing dirt, grease, and stuck-on residue, which means a well-made homemade cleaner can perform beautifully on routine surfaces when used correctly.
Disinfecting is a different goal, because killing germs reliably can require specific ingredients, correct concentrations, and enough contact time, so a labeled disinfectant is often the safer choice when illness is involved.
Confidence grows when you separate “cleaning” from “disinfecting,” since that one distinction prevents risky assumptions and helps you pick the right tool for the job.
When you need a true disinfectant for high-risk situations, following product directions and safety labels matters more than saving a few dollars, because health and safety should remain the priority.
- Routine cleaning means removing visible soil, crumbs, grease, and soap scum from common surfaces.
- Targeted disinfecting may be appropriate after illness, for certain bathroom surfaces, or when handling raw meat messes.
- Specialty surfaces like natural stone, antique finishes, or delicate electronics often need more cautious product choices.
- Budget-friendly cleaning still works best when you treat safety as part of the savings plan.
A quick “should I DIY this?” checklist
Decision-making becomes easier when you ask a few short questions before mixing anything, because a calm pause prevents rushed mistakes.
Practical frugal cleaning starts with selecting the simplest safe option, not the most complicated recipe you saw online.
- Ask whether the surface is delicate, porous, or easily damaged, because those materials often need gentler products and testing.
- Check whether anyone in the household has asthma, allergies, or scent sensitivity, because fragrance and sprays can irritate.
- Decide if your goal is “remove grime” or “disinfect,” because the tool and technique can differ.
- Confirm whether pets or children can access the area, because storage and drying time become part of safety.
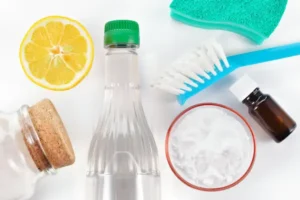
Basic ingredients for homemade cleaners that keep costs low
Most homemade cleaners rely on a small group of inexpensive ingredients that you can use across many recipes, which is exactly why they fit a diy cleaning products on budget approach so well.
Choosing multipurpose basics reduces clutter because one ingredient can replace several single-use bottles, while still keeping your routine simple.
Your frugal cleaning ingredient list
Start with the basics below, then add only what you will actually use, because unused “extra ingredients” are just another form of waste.
Labeling and storing correctly matters because clear containers and clear names prevent accidental misuse.
- Dish soap: A gentle surfactant that helps lift grease and stuck-on dirt when diluted properly.
- White vinegar: A mild acid that helps with mineral buildup and soap scum on many non-stone surfaces.
- Baking soda: A mild abrasive and deodorizer that helps scrub without harsh scratching when used carefully.
- Washing soda: A stronger alkaline cleaner that can help with heavy grime, used cautiously and with gloves.
- Isopropyl alcohol (rubbing alcohol): Useful for quick-drying glass and some high-touch areas, used with ventilation.
- Hydrogen peroxide (common household strength): A mild oxidizer that can help with some stains, used separately and stored in its original dark bottle.
- Warm water: Often the most underrated “ingredient,” because heat improves grease removal and helps soap work better.
- Microfiber cloths: Not an ingredient, yet essential for frugal cleaning because they reduce product use and scrub effectively.
Optional add-ons that some households like
Optional ingredients can be helpful when they truly match your needs, though skipping them is perfectly fine when the goal is keeping things affordable and straightforward.
Sensitive households often do better with low-scent, low-irritation mixes, so “optional” really means optional.
- Castile soap: A plant-based soap that can work in some recipes, though it should not be mixed with vinegar because it can curdle and lose effectiveness.
- Citrus peels: Sometimes used for scent, yet they add variability and potential spoilage, so caution is wise.
- Essential oils: Popular for fragrance, though they can irritate skin and airways, and some are unsafe for pets, so careful research and restraint matter.
Tools and containers that make DIY cleaning easier and safer
Good tools can save money because they reduce how much product you need, and they help you clean faster with fewer repeat passes.
Safety improves when you use proper containers, because reusing random food bottles can create confusion and accidental exposure.
Recommended basic tools
- Spray bottles with clear labels, because “mystery liquid” is never a good household system.
- Measuring spoons and a measuring cup, because consistent ratios reduce residue and reduce damage risk.
- Microfiber cloths, because they lift grime efficiently while using less liquid.
- A scrub brush and an old toothbrush, because detail scrubbing prevents overusing abrasive powders.
- Reusable gloves, because protecting your skin helps you clean comfortably and avoids irritation.
- A small funnel, because fewer spills means fewer wasted ingredients and fewer slick floors.
Labeling and storage rules that prevent accidents
Clear labeling is not extra work, because it is the system that prevents a harmless cleaner from becoming a harmful mistake.
Household safety gets easier when you treat every bottle like it could be picked up by the wrong person at the wrong moment.
- Write the recipe name, the main ingredients, and the date mixed on each container, because freshness and clarity matter.
- Store cleaners out of reach of children and pets, because “natural” does not mean safe to ingest.
- Keep hydrogen peroxide in its original bottle, because light exposure can reduce effectiveness over time.
- Never place homemade cleaners in food or drink containers, because accidental swallowing is a real risk.
Safety warnings you should follow every single time
Cleaning ingredients may be common, yet common does not mean harmless, because many injuries happen through casual use rather than dramatic accidents.
Safe recipes start with safe habits, so these warnings are part of the savings plan, not an afterthought.
Never mix these combinations
Some mixtures can create dangerous gases or harsh reactions, so strict avoidance is the simplest, safest rule.
When in doubt, keep ingredients separate and rinse surfaces between products, because separation reduces chemical reactions.
- Bleach + ammonia: This combination can release toxic chloramine gases, so it should never be mixed.
- Bleach + vinegar or other acids: This can release chlorine gas, so it should never be mixed.
- Hydrogen peroxide + vinegar in the same container: Mixing can create peracetic acid, which can be irritating and unsafe, so use them separately and rinse between.
- Different drain cleaners together: Combining products can cause violent reactions, so only use one product as directed, or choose mechanical methods like a drain snake.
Spot-testing protects surfaces and prevents costly damage
Testing is especially important for painted surfaces, sealed wood, specialty finishes, and fabrics, because damage can be permanent and expensive.
A quick test in a hidden area can save you from etched stone, dulled finishes, or discolored grout.
- Apply a small amount to an inconspicuous spot, because hidden testing prevents visible mistakes.
- Wait at least 5 to 10 minutes, because some reactions happen slowly.
- Wipe and check for color change, dullness, or texture change, because those are early warning signs.
- Proceed only if the surface looks unchanged, because “maybe it’s fine” is not a good cleaning plan.
Ventilation and skin protection are part of frugal cleaning
Fresh air matters because sprays and fumes can irritate lungs, especially for children, pets, and anyone with asthma or allergies.
Gloves matter because repeated exposure to acids, alkalis, and soaps can dry skin and cause irritation over time.
- Open windows or run fans during bathroom cleaning, because small rooms concentrate fumes quickly.
- Use gloves when scrubbing with washing soda or strong mixtures, because alkalines can irritate skin.
- Keep spray away from faces and eyes, because splashes can happen faster than you expect.
- Wash hands after cleaning, because residue can transfer to food, eyes, and sensitive skin.
DIY cleaning products on budget: core recipes you can actually use
The recipes below focus on everyday surfaces, because the biggest savings usually come from replacing the “daily use” bottles rather than the occasional specialty item.
Each recipe includes where it works well and where it should be avoided, because safe recipes depend on the surface and the situation.
Recipe 1: Gentle all-purpose cleaner for most sealed surfaces
This is the go-to mix for light kitchen and household messes, because dish soap lifts grease while water dilutes it to a gentle level.
Sealed surfaces handle this well, while porous or delicate surfaces still need testing.
- Ingredients: 2 cups warm water, 1 teaspoon dish soap.
- Optional: 1 tablespoon white vinegar for extra mineral cutting, used only on surfaces that tolerate vinegar.
- Add warm water to a spray bottle first, because filling with water reduces foaming when soap is added.
- Pour in dish soap gently, because too much soap can leave sticky residue that attracts dirt.
- Swirl lightly instead of shaking aggressively, because excessive bubbles make spraying harder and waste product.
- Spray on the surface, wipe with a microfiber cloth, and buff dry, because drying reduces streaks.
- Works well on: sealed countertops, painted walls (spot test), appliance exteriors, cabinet fronts, sealed tile.
- Avoid on: unsealed wood, natural stone like marble or granite if vinegar is included, and any surface that warns against soap residues.
Recipe 2: Vinegar spray for soap scum and mineral buildup
Vinegar helps dissolve mineral deposits and soap scum on many bathroom surfaces, which can make it a strong frugal cleaning ally.
Natural stone and some specialty finishes can be damaged by acids, so careful surface selection matters.
- Ingredients: 1 cup white vinegar, 1 cup water.
- Mix vinegar and water in a spray bottle, because dilution reduces harshness while still helping with buildup.
- Spray onto glass shower doors, faucets, or tile, then let it sit for 5 to 10 minutes, because dwell time improves performance.
- Wipe or scrub gently, then rinse with water, because rinsing prevents lingering acid on metal and grout.
- Dry with a clean cloth, because drying reduces water spots and slows future buildup.
- Works well on: glass, ceramic tile, many chrome fixtures, plastic shower walls (spot test).
- Avoid on: marble, granite, limestone, travertine, unsealed grout, and surfaces that are acid-sensitive.
Recipe 3: Baking soda paste for gentle scrubbing
Baking soda provides mild abrasion, which helps with stuck-on grime when you need scrubbing power without harsh chemical fumes.
Scratch risk still exists on glossy or delicate finishes, so gentle pressure and testing matter.
- Ingredients: baking soda, a small amount of water.
- Place baking soda in a small bowl, because mixing in a bowl keeps moisture controlled.
- Add water slowly until a paste forms, because a thick paste clings to grime better than a watery mix.
- Apply to the area and scrub softly with a sponge or cloth, because gentle abrasion is the goal.
- Rinse thoroughly and dry, because residue can leave a white film if left behind.
- Works well on: sinks, tubs (non-delicate), stove tops (spot test), grout touch-ups.
- Avoid on: acrylic surfaces that scratch easily, glossy finishes, and any surface you have not spot-tested.
Recipe 4: Simple glass and mirror cleaner that dries fast
Streak-free glass usually comes down to technique, yet a quick-drying mix can make the process easier and faster.
Ventilation matters because alcohol fumes can build up in small spaces.
- Ingredients: 1 cup water, 1 cup isopropyl alcohol, optional 1 tablespoon white vinegar.
- Combine water and alcohol in a spray bottle, because equal parts often provide a good balance of cleaning and drying.
- Spray lightly onto a microfiber cloth rather than flooding the glass, because overspray can drip onto frames and nearby surfaces.
- Wipe in a consistent pattern, then buff with a dry cloth, because finishing dry reduces streaking.
- Use ventilation during cleaning, because airflow keeps the experience comfortable and safer.
- Works well on: mirrors, windows, glass tables (spot test), stainless steel fingerprints when used lightly.
- Avoid on: tinted films, certain coated screens, and anything that warns against alcohol.
Recipe 5: Degreasing kitchen spray for stovetops and cabinet fronts
Kitchen grease often needs a bit more muscle than an all-purpose spray, yet you can still stay budget-friendly with a stronger soap approach and warm water.
Residue can happen if soap is too concentrated, so measured amounts matter.
- Ingredients: 2 cups warm water, 1 tablespoon dish soap, optional 1 tablespoon baking soda.
- Mix warm water and soap, because heat helps loosen grease and improves cleaning power.
- Add baking soda only if you need extra scrubbing, because baking soda can leave residue if overused.
- Spray and let it sit briefly, because a short dwell time reduces the need to scrub aggressively.
- Wipe with a damp cloth, then wipe again with plain water, because a rinse pass prevents sticky buildup.
- Works well on: sealed cabinet fronts, stove exteriors, backsplashes, range hood exteriors.
- Avoid on: unsealed wood, matte specialty finishes that show streaks, and sensitive painted areas without testing.
Recipe 6: Bathroom gel scrub for tubs and sinks
Bathrooms collect soap scum, body oils, and hard-water marks, so a paste-style scrub can be helpful without requiring multiple specialty products.
Gentle pressure keeps surfaces looking nice, while patience reduces the urge to over-scrub.
- Ingredients: baking soda, a small squirt of dish soap, enough water to form a thick paste.
- Combine baking soda and dish soap, because soap helps lift oils while baking soda provides scrub power.
- Add water a little at a time, because a thick paste stays where you put it.
- Spread on the surface and let it sit for 5 minutes, because dwell time helps loosen grime.
- Scrub gently, then rinse thoroughly, because leftover paste can dry into a chalky residue.
- Works well on: porcelain sinks, many tubs, tile surfaces (spot test), shower floors (spot test).
- Avoid on: delicate acrylic and any surface that scratches easily, because abrasion can dull shine.
Recipe 7: Toilet bowl cleaner with safer expectations
Toilet bowls often need both cleaning and odor control, while disinfecting requirements may be higher depending on your household’s needs and health situation.
When true disinfection is needed, following a labeled disinfectant’s directions can be the safer route, while DIY options can still help with routine cleaning.
- Ingredients: 1 cup white vinegar, baking soda for scrubbing, toilet brush.
- Pour vinegar into the bowl and let it sit for 10 to 15 minutes, because time helps loosen mineral deposits.
- Sprinkle baking soda around the bowl, because mild abrasion helps remove ring buildup.
- Scrub with a brush thoroughly, because mechanical scrubbing is the main cleaning power here.
- Flush and rinse the brush, because hygiene and tool care matter for bathrooms.
- Works well for: routine toilet bowl cleaning, mild mineral rings, odor reduction.
- Use extra caution for: homes with illness or higher disinfection needs, because DIY cleaning is not always equivalent to disinfection.
Recipe 8: Floor cleaner for sealed hard floors
Floors can be cleaned effectively with very mild solutions, because too much soap leaves residue that attracts dirt and makes floors feel sticky.
Manufacturer guidance matters for floors, so testing and conservative dilution are smart.
- Ingredients: 1 gallon warm water, 1 teaspoon dish soap.
- Optional: a small splash of vinegar for tile only, used cautiously and never on stone or waxed surfaces.
- Fill a bucket with warm water, because warm water helps lift grime with less product.
- Add a tiny amount of soap, because minimal soap prevents residue and reduces the need for rinsing.
- Wring the mop well, because overly wet floors can warp some materials and slow drying.
- Rinse with clean water if floors feel sticky, because residue removal is often the missing step.
- Works well on: sealed tile, sealed vinyl, sealed laminate (with minimal moisture), sealed hardwood with caution.
- Avoid on: unsealed wood, waxed floors, and natural stone if vinegar is involved.
Recipe 9: Laundry booster for odors and brightening, used carefully
Laundry can become expensive when every load gets multiple add-ons, so a simple booster used thoughtfully can support frugal cleaning without overcomplicating your routine.
Fabric care labels matter because some fibers and dyes react poorly to certain boosters.
- Option A: baking soda, used in small amounts as a deodorizer.
- Option B: oxygen-based booster products as directed, when you want a stronger option than a pantry ingredient.
- Add a small amount of baking soda to the wash, because too much powder can leave residue in some machines.
- Prioritize proper detergent measurement, because overdosing detergent often causes odors and buildup that people try to “fix” with more products.
- Dry items thoroughly, because lingering dampness can create smells that no additive can solve long-term.
- Works well for: everyday odor control, towels that need freshness, gym clothes (spot test and fabric check).
- Avoid for: delicate fabrics without testing, because some items need gentler care.
Surface-specific warnings that save you from expensive mistakes
Frugal cleaning can turn costly if the wrong cleaner damages a surface, so knowing your materials is a huge part of diy cleaning products on budget success.
Surface awareness makes every recipe safer because you stop guessing, and you start choosing intentionally.
Natural stone deserves special caution
Stone like marble, granite, limestone, and travertine can be etched by acids, which means vinegar and lemon-based mixes are often a bad match even when they seem “natural.”
Gentle soap and water, plus a stone-safe approach, is typically the safer direction when you want to protect the finish.
- Avoid vinegar on natural stone, because etching can permanently dull and pit the surface.
- Use a mild soap solution and a soft cloth, because gentle cleaning preserves the seal and shine.
- Dry the surface after wiping, because standing water can cause spots and mineral marks.
Wood, painted walls, and specialty finishes need testing
Paint and wood finishes vary widely, so a cleaner that works in one house might dull a different finish in another house.
Testing a small hidden patch prevents regret and protects your home’s look.
- Use minimal moisture on wood, because excess water can swell, warp, or dull the finish.
- Choose gentle soap and water for most painted walls, because aggressive scrubbing can remove paint or change sheen.
- Wipe and dry quickly on cabinets, because standing moisture can damage edges and seams.
Electronics and screens need a different approach
Sprays can seep into openings and cause damage, so using a lightly dampened cloth is often safer than spraying directly.
Manufacturer instructions matter here, so caution beats improvisation when electronics are expensive.
- Turn off devices before cleaning, because it improves visibility and reduces risk.
- Use a barely damp microfiber cloth, because excess liquid is the main danger.
- Avoid strong acids, abrasives, and alcohol on coated screens unless the device guidance allows it, because coatings can be damaged.
“Printable style” outlines to keep your DIY cleaning simple
Structure keeps DIY routines from getting messy, because a clear list prevents random mixing and repeated trips to the store.
Copying these outlines into a note or printing them can reduce mental load, which helps frugal cleaning feel easy instead of complicated.
Quick pantry-to-cleaner conversion chart
- Dish soap + water: everyday all-purpose cleaning for many sealed surfaces.
- Vinegar + water: soap scum and mineral deposits on non-stone surfaces.
- Baking soda paste: gentle scrub for stuck-on grime when surfaces tolerate mild abrasion.
- Alcohol + water: fast-drying glass and mirror cleaning with ventilation.
Weekly frugal cleaning routine that uses fewer products
- Wipe kitchen counters daily with a mild soap solution, because frequent light cleaning prevents heavy scrubbing later.
- Hit bathroom sinks and faucets twice a week with vinegar spray if surfaces allow, because regular maintenance prevents thick buildup.
- Mop sealed floors weekly with minimal soap, because residue-free floors stay cleaner longer.
- Do one “detail zone” each week, because rotating small zones beats marathon cleaning days.
DIY bottle label template you can copy
- Name: ______________________
- Main ingredients: ______________________
- Date mixed: ______________________
- Where to use: ______________________
- Where to avoid: ______________________
Smart buying habits that make frugal cleaning even cheaper
DIY recipes reduce spending, yet the biggest long-term savings often come from using less product, avoiding duplicates, and keeping tools in good condition.
Mindful habits turn a small ingredient list into a complete system, which prevents the slow creep back into buying many specialized bottles.
Ways to spend less without lowering cleaning quality
- Measure soap instead of eyeballing it, because too much soap causes residue and triggers extra cleaning later.
- Use microfiber cloths and wash them properly, because strong tools reduce the amount of cleaner you need.
- Keep a small “cleaning caddy,” because having basics in one place prevents impulse purchases during frustration.
- Refill bottles from a small batch, because making huge batches increases waste if you dislike the recipe.
Technique tips that beat stronger chemicals
Time and agitation often do more than harsh ingredients, so patience can be the most budget-friendly “upgrade” you can use.
Gentle repetition is often safer than one aggressive scrub session that damages surfaces.
- Let cleaners sit briefly on grime, because dwell time softens buildup and reduces scrubbing effort.
- Work top to bottom, because gravity moves dirt downward and prevents re-cleaning.
- Rinse when needed, because leftover cleaner can attract new dirt and cause streaks.
- Dry surfaces after cleaning, because water spots and moisture buildup create the “dirty again” feeling.
Common DIY mistakes that waste money or create safety issues
Most DIY cleaning disappointments come from simple missteps, like using the wrong recipe for the surface or using far more product than needed.
Fixing these mistakes tends to improve results immediately, which makes homemade cleaners feel more reliable.
Mistakes to avoid with homemade cleaners
- Mixing too strong, because high concentrations can leave residue or damage finishes.
- Using vinegar on stone, because etching is permanent and expensive.
- Assuming “natural” equals “safe,” because irritation and poisoning can still happen.
- Storing mixtures too long without labeling, because unknown bottles create risk and confusion.
- Chasing internet “hack” combos, because some trendy mixes neutralize each other or create unsafe reactions.
Gentle fixes that usually improve results
- Reduce soap amounts, then rinse, because sticky residue often causes dullness and re-soiling.
- Increase dwell time instead of increasing strength, because patience often replaces harshness.
- Switch cloths mid-job, because dirty cloths smear grime and make you think the cleaner failed.
- Use warm water strategically, because heat can lift grease without extra chemicals.
Frequently asked questions about diy cleaning products on budget
Are homemade cleaners safe for homes with kids and pets
Safety depends on ingredients, storage, and use, because even common household products can be harmful if swallowed or sprayed into eyes.
Careful labeling, locked storage, and allowing surfaces to dry fully reduce risk, while fragrance choices should be extra cautious for sensitive pets.
Can I add essential oils to make things smell better
Essential oils can irritate skin and lungs, and some are unsafe for pets, so using them sparingly or skipping them entirely is a reasonable safety choice.
Fresh air, clean cloths, and removing the source of odors usually work better than masking smells with strong scents.
Why do some DIY recipes stop working over time
Effectiveness can drop when ingredients separate, when mixtures sit too long, or when ratios are inconsistent, which is why small batches and measuring help.
Results can also change because different messes need different tools, so a single recipe will not be perfect for every cleaning job.
What should I do if I accidentally mix something questionable
Immediate safety comes first, so leaving the area, increasing ventilation, and avoiding inhalation can be important if fumes appear.
Professional guidance should be sought if exposure is suspected, because chemical reactions can be dangerous and require expert advice.
Closing reminder: simple, safe, and consistent beats complicated
DIY cleaning products on budget work best when you focus on a small set of homemade cleaners that cover most daily messes, while keeping strong safety rules for mixing, labeling, and surface testing.
Practical frugal cleaning is not about doing everything “from scratch,” because buying a specialty product for a true specialty need can still be the smartest choice.
Gentle recipes, careful technique, and steady routines usually deliver the best results, especially when you avoid risky combinations and treat safety as non-negotiable.
Reminder: Always test on a hidden area first, store mixtures safely, ventilate your space, and avoid mixing products that can be harmful.
Notice: This content is independent and has no affiliation, sponsorship, or control over any institutions, platforms, or third parties mentioned.