If you have ever stared at two nearly identical products and felt your brain freeze, you are not alone, because sticker prices are designed to be quick, emotional, and slightly misleading when sizes and formats change.
This guide will show you how to choose based on unit price, so your “best deal” feeling finally matches the math when you shop.
You will learn what unit pricing really means, how to do a clean value comparison in seconds, and what to do when unit price labels are missing or confusing, while still remembering that quality and real-life usage matter.
Notice: this content is independent and has no affiliation, sponsorship, or control over any stores, brands, apps, or third parties mentioned.
Why sticker price tricks your brain in the aisle
Sticker price is the loudest number on the shelf, so it grabs your attention first, yet it often hides the most important detail, which is how much product you are actually getting for that money.
Smaller packages can look cheaper and feel safer to buy, even when they cost far more per ounce, per sheet, per load, or per serving than a larger size sitting right beside them.
Retail packaging also plays with shape and perception, because a tall skinny bottle can look “bigger” than a short wide one, even when the volume is smaller, and your eyes naturally trust height more than capacity.
Promotion tags add extra noise, since “sale” and “family size” sound like savings, but those words do not guarantee a better deal unless the unit price backs them up.
Another common trap is comparing different forms, such as shredded versus block cheese or pods versus liquid detergent, because the sticker price compares totals while your household experiences cost per use, which is where your budget actually feels the impact.
Once you start using unit pricing, you stop arguing with your instincts and start guiding them, because your brain still gets a quick answer, just a more accurate one.
- Sticker price answers “How much do I pay today,” while unit pricing answers “How much do I pay for each usable unit,” which is the number that compounds across months.
- Package design can distort perceived volume, so the fairest comparison is the unit price printed on the label or calculated by you.
- Sale tags can be real savings or pure decoration, which is why the unit number is your reality check.
Comparing unit prices at stores: the one number that keeps you honest
Unit price is simply the cost per standard measure, such as price per ounce, price per pound, price per liter, price per count, or price per 100 sheets, and it exists so you can compare different sizes and brands on an equal playing field.
Unit price labels are usually smaller than the main price, but that tiny number is the one that lets you make a confident decision without guessing or doing mental gymnastics under fluorescent lights.
A clean definition helps: unit price equals total price divided by the number of units, and the “unit” can be weight, volume, length, count, or even a functional unit like loads of laundry, depending on how the store labels the category.
When you rely on unit pricing, you are choosing based on value per unit instead of emotion per package, which is the foundation of steady grocery savings.
Where unit price labels usually appear, and why they vary
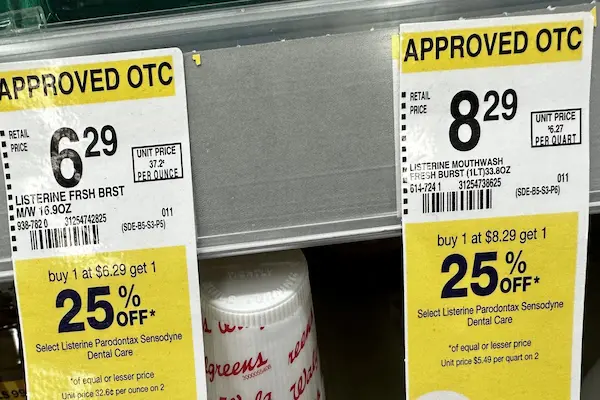
Shelf tags often show the big sticker price and a smaller line that reads something like “$0.19/oz” or “$0.04/sheet,” and that smaller line is the unit price you want to compare across items.
Different stores choose different units for the same category, so one store might show yogurt as price per ounce while another shows price per pound, and your job is to compare apples to apples inside the same unit system for that shelf.
Many stores also round unit prices, which is useful for speed but not perfect for precision, so you should treat unit price labels as a strong guide, then double-check with a quick calculation when the difference is extremely small or the stakes are high.
Errors happen, especially after resets, so the most powerful habit is learning the method well enough that you can spot a unit price that looks “off” before it costs you money.
What a good unit price comparison looks like
A good value comparison is calm and specific, because you compare the same unit measure, you scan two or three options, and you pick the lowest unit cost that still fits your quality needs and your realistic usage timeline.
Impulse fades when the decision becomes a simple ranking, since the shelf transforms from “Which one do I like” to “Which one delivers the most value per unit for my household.”
- Find the unit price line on the shelf label, and note the unit, such as ounces, pounds, or count, before you compare any numbers.
- Compare unit prices only within the same unit, because $0.25/oz cannot be fairly compared to $3.99/lb without conversion.
- Choose the lowest unit price that still matches your preferences for taste, performance, ingredients, or durability, because “cheapest” is not always “best.”
How to calculate unit price in 10 seconds, even when the label is tiny
Calculating unit price is less about being “good at math” and more about using a repeatable mini-formula, because the same steps work for cereal, coffee, soap, pasta, paper towels, and almost anything else in a grocery store.
If you can divide the total price by the number of units, you can create your own unit price and make a confident choice, even when the shelf tag is missing or confusing.
The simple formula you will use again and again
Unit price equals total price divided by total units, so a $4.50 item that contains 18 ounces has a unit price of $4.50 ÷ 18 = $0.25 per ounce when rounded to the nearest cent.
Rounding is your friend in the aisle, because you are not doing accounting, you are deciding between options, and even a rough unit price usually reveals the better value quickly.
A fast step-by-step method that works in real aisles
- Read the package size carefully, because a “net weight” in ounces compares best to price per ounce, while fluid ounces compare best for liquids when the label uses volume.
- Divide the sticker price by the size number, and round to two decimals, so the result looks like a standard shelf unit price you can compare instantly.
- If the sizes are messy, round the package size to an easy number first, because speed matters more than perfection when the difference is large.
- Compare your computed unit price to the other option, then pick the lower number if quality and usability are similar.
- A quick phone calculator is fine, but mental rounding often works just as well, especially when one option is clearly cheaper per unit.
- Conversions matter when units differ, so keep a simple anchor in mind, like 16 ounces per pound, to translate quickly when needed.
- Counting “uses” can be smarter than counting ounces for items like detergent, trash bags, or coffee pods, because cost per use matches how you actually consume the product.
Worked examples that make unit pricing feel obvious
Examples are where unit pricing becomes intuitive, because you can see the numbers land in your hands like a ruler, and the “best deal” stops being a vibe and starts being a visible comparison.
Each scenario below shows how price per ounce and other unit measures create clarity when sizes, brands, and promotions try to blur the choice.
Example 1: Two peanut butter jars with different sizes
Imagine Jar A costs $3.99 for 16 ounces, while Jar B costs $5.49 for 28 ounces, and your brain might initially lean toward Jar A because the sticker price is lower and feels safer.
Now calculate the unit price: Jar A is $3.99 ÷ 16 = about $0.25/oz, while Jar B is $5.49 ÷ 28 = about $0.20/oz, which means Jar B is cheaper per ounce and delivers better value if you will actually use it before it expires.
- Jar A: $3.99 ÷ 16 oz ≈ $0.25 per ounce, which is the “pay more for each spoonful” option.
- Jar B: $5.49 ÷ 28 oz ≈ $0.20 per ounce, which is the “pay less for each spoonful” option.
- Decision tip: pick the lower unit price only if the bigger jar fits your pantry space and your household will finish it without waste.
Example 2: Coffee with different grinds and “premium” cues
Consider a 12-ounce bag priced at $9.99 and a 20-ounce bag priced at $14.49, because the smaller one might look “specialty” while the larger one looks like a basic bulk buy, yet the unit price tells the real story.
Compute price per ounce: $9.99 ÷ 12 ≈ $0.83/oz, and $14.49 ÷ 20 ≈ $0.72/oz, so the bigger bag is cheaper per ounce, while quality differences should be judged separately through flavor notes, roast date, and your taste preferences.
- Check whether the coffee will stay fresh long enough, because a bargain per ounce is not a bargain if half the bag goes stale and gets tossed.
- Compare cost per cup if you know your recipe, because some coffees brew stronger and effectively reduce cost per serving even when price per ounce is higher.
- Use unit price as the baseline, then let flavor and freshness decide when the numbers are close.
Example 3: Yogurt multipacks versus single cups
Suppose a 4-pack of 6-ounce cups costs $3.79 and single 6-ounce cups cost $1.09 each, because multipacks often feel like the “smart” choice even when the math goes the other way on certain promotions.
Calculate: the multipack has 24 ounces total, so $3.79 ÷ 24 ≈ $0.16/oz, while the single cup is $1.09 ÷ 6 ≈ $0.18/oz, making the multipack cheaper per ounce and usually better for grocery savings if you actually like all the flavors inside the pack.
- Multipack unit price: about $0.16 per ounce, which rewards commitment to a set of flavors.
- Single cup unit price: about $0.18 per ounce, which costs more but buys flexibility and variety.
- Practical angle: flexibility can be worth paying for if it prevents waste from “meh” flavors that sit untouched.
Example 4: Paper towels where “sheets” matter more than “rolls”
Paper towels are a classic unit pricing puzzle, because packages brag about roll count while the real unit you use is sheets, and “double roll” branding can hide the actual sheet total if you do not look closely.
If Pack A is $12.99 for 6 rolls with 120 sheets each, and Pack B is $18.99 for 12 rolls with 90 sheets each, then Pack A has 720 sheets and Pack B has 1080 sheets, so compare price per sheet: $12.99 ÷ 720 ≈ $0.018 per sheet, and $18.99 ÷ 1080 ≈ $0.018 per sheet, which shows they are nearly identical in value despite wildly different roll counts.
- Multiply rolls by sheets per roll to get total sheets, because “roll count” alone is not a usable unit for comparison.
- Divide price by total sheets, and round to the third decimal if the values are close, because tiny differences add up over time.
- Consider durability, because thicker sheets can reduce how many you grab per spill, lowering real cost per use even when unit price labels look similar.
Example 5: Laundry detergent where cost per load is the true unit
Detergent can be deceptive, because bottles vary in concentration, so ounces are not always the best unit, and the label “loads” often reflects the recommended dose rather than what you actually pour at home.
If Detergent A is $14.99 for 60 loads and Detergent B is $19.99 for 100 loads, then the unit is cost per load: A is $14.99 ÷ 60 ≈ $0.25 per load, while B is $19.99 ÷ 100 = $0.20 per load, making B a better value comparison if both clean well for your water hardness and your typical soil level.
- Cost per load is more meaningful than price per ounce, because performance depends on dose size and concentration.
- High-efficiency machines and measured dosing can stretch loads further, so your real cost can beat the label when you use the correct amount.
- Scent and skin sensitivity matter, so value includes comfort and effectiveness, not only the lowest number.
Comparing unit prices at stores when unit price labels are missing
Sometimes a shelf tag is torn, the unit price line is absent, or the category is a special display with minimal signage, and that is exactly when knowing the method saves you from defaulting back to sticker price guessing.
Even a rough unit price you calculate on the spot can protect your budget, because the goal is not perfect math, it is a better decision than the one you would make without the unit lens.
Use rounding to make fast math feel effortless
Rounding is a practical superpower, because $4.79 becomes $4.80 and 18 ounces becomes 20 ounces, and that quick estimate often reveals the winner without any stress or precision anxiety.
If the rounded unit prices come out close, that is your signal to either do the exact division or let quality, freshness, and preference decide the tiebreaker.
- Round the price to the nearest dime, and round the size to an easy number, because speed matters most when the difference is obvious.
- Divide rounded price by rounded size, and compare the two results as a quick screening step before you invest more attention.
- Recalculate precisely only when the results are very close, because that is when small differences can actually sway the best value choice.
When the unit is unclear, choose the unit you actually use
Produce can be priced per pound while you think per piece, spices can be priced per ounce while you think per recipe, and cleaning products can be priced per bottle while you think per month, so your unit should reflect real household consumption.
For the most accurate grocery savings, translate the store unit into your life unit, because value comparison is only meaningful when it matches how you use the item at home.
- For produce: estimate how many items you typically get per pound, then translate price per pound into price per item for your usual size.
- For meat: compare price per pound across cuts, then adjust for bone, fat, or shrinkage if one cut yields less edible portion.
- For pantry staples: compare price per ounce, then consider how many meals the package realistically covers in your routine.
Smart tactics for messy categories like snacks and frozen foods
Snack boxes, variety packs, and frozen multipacks often mix flavors and sizes, which makes unit pricing feel fuzzy, yet you can still build a fair comparison by using total net weight or total count as the consistent base.
If the pack includes items you do not like, treat that as functional waste, because paying less per ounce does not help if a chunk of the ounces never get eaten.
- Find total net weight on the box, because that number allows a price per ounce calculation even when individual portions vary slightly.
- Adjust value by preference, because an “unwanted flavor tax” quietly raises your real cost per enjoyable serving.
- Use unit price as the anchor, then evaluate convenience, portion control, and nutrition as the deciding factors when the math is close.
Unit price labels are powerful, but they are not magic
Unit price labels are a helpful shortcut, yet they are only as good as the store’s data and the unit chosen for the category, which means you should treat them as a guide rather than a sacred truth.
Mistakes can happen during promotions, and units can change between adjacent products, so your best defense is knowing what a “reasonable” unit price looks like for the item you buy often.
How to sanity-check a unit price label in seconds
A sanity check is simply asking whether the unit price “fits” the sticker price and package size, because a 10-ounce item priced at $10 should not show a unit price of $0.10/oz without something being wrong.
When you notice a mismatch, take a quick photo for your own reference if you like, and consider asking a staff member, while remembering that policies vary by store and you do not control third-party pricing or signage.
- Compare the unit price label to a quick mental estimate, because even rough division can reveal an obvious error.
- Check that the unit is the same, because “per ounce” and “per pound” can sit close together and create false comparisons.
- Verify promotions, because a sale price might apply only with a loyalty condition or a multi-buy requirement that changes the effective unit cost.
Common traps where the lowest unit price is not the best deal
The lowest unit price wins only when the product will be used fully and performs acceptably, because value is what you actually consume and enjoy, not what you theoretically bought.
Quality, storage, shelf life, and convenience can make a slightly higher unit price the smarter choice, especially for smaller households or picky eaters who value consistency and waste prevention.
Trap 1: Buying bigger than your real usage
Bulk can be brilliant, yet it can also be a budget leak when it creates spoilage, clutter, or guilt, because unused product has a unit price of “infinite” once it gets tossed or forgotten behind newer purchases.
A realistic value comparison includes your pace of consumption, your storage space, and the product’s ability to stay fresh and effective for the time it will sit in your home.
- Estimate how long the larger size will last, and compare that timeline to the product’s freshness window or recommended use period.
- Consider storage, because a deal you cannot store safely becomes stress, and stress is a hidden cost that makes you avoid using what you bought.
- Buy the size that matches your life, because the best unit price is the one you can actually convert into meals, clean laundry, or daily use.
Trap 2: Comparing different qualities as if they are identical
Two products can share the same unit and still deliver different results, such as paper towels that tear easily, shampoo that requires more product per wash, or canned tomatoes with noticeably different flavor and texture in cooking.
When performance differs, your real unit becomes “effective use,” and a slightly higher price per ounce can become a better value if you use less each time or enjoy the result more consistently.
- For cleaning: consider dilution and required amount, because concentrates often lower cost per use even when sticker price looks higher.
- For food: consider taste and waste, because cheap food that goes uneaten is more expensive than enjoyable food that gets finished.
- For personal care: consider sensitivity and comfort, because irritation or dryness can push you to buy replacements, canceling any savings.
Trap 3: Multi-buy deals that change the effective unit price
Promotions like “2 for $6” can be real savings or a nudge to buy more than you need, and the correct approach is to calculate the effective price per unit under the exact conditions required.
If the deal requires buying two, your unit price is based on the total paid divided by the total units acquired, and your personal value still depends on whether both items will be used before quality drops.
- Confirm whether the store requires purchasing the stated quantity, because some promotions give the same per-item price even if you buy one, while others do not.
- Calculate the deal unit price, then compare it to the regular unit price of your preferred brand to see whether the promotion truly improves value.
- Walk away when the promotion forces you into unwanted flavors or extra volume, because forced quantity often converts savings into waste.
Trap 4: Ignoring “hidden units” like drained weight and edible yield
Some foods look comparable by net weight, yet what you eat depends on drained weight, trimming, or cooking loss, which means the best value comparison sometimes requires thinking about edible portion rather than package weight alone.
For example, a frozen shrimp bag with more glaze or a meat cut with more bone can have a great sticker price but a weaker price per edible ounce once prepared.
- Look for “drained weight” on canned items when available, because it can reveal a higher real cost per edible ounce than the net weight suggests.
- Consider yield for bone-in cuts, because your plate is paying for edible protein, not packaging or inedible parts.
- Use your experience, because you know which items shrink heavily during cooking and which ones hold their weight well.
Grocery savings checklist you can run in under 30 seconds
A checklist keeps you from overthinking, because it turns a messy shelf into a simple sequence, and that sequence becomes a habit that quietly improves your budget every single trip.
Use this as a practical routine for comparing unit prices at stores, especially when you feel rushed or surrounded by too many options.
- Identify the unit used on the shelf, and make sure you compare the same unit across items before you react to any sale messaging.
- Scan three options maximum, because too many comparisons create decision fatigue and tempt you to revert to sticker price impulsivity.
- Choose the lowest unit price only if you will use the full amount, because the best deal is the one that disappears into meals and routines, not clutter.
- Break ties using quality, ingredients, convenience, and preference, because value includes satisfaction and performance, not just pennies per ounce.
- Recheck promotions for conditions, because multi-buy rules and loyalty requirements can change the real unit price you will pay at checkout.
- If the unit price labels are missing, calculate price per ounce or price per count using quick division and rounding, because even a rough estimate protects you from the biggest mistakes.
- If you are uncertain about spoilage, choose the size you will finish comfortably, because waste turns “cheap” into “expensive” in one forgotten week.
- If a product is new to you, buy the smaller size once, then upgrade to the better unit price size after you confirm you actually like and use it.
Make unit pricing visual so your eyes learn faster than your calculator
The goal is to train your eyes to notice unit price first, because the faster you spot the correct comparison number, the less effort the decision requires, and the more consistent your grocery savings become.
With repetition, you will start predicting unit prices before you even read them, and that prediction makes you quicker at spotting true value and ignoring flashy distractions.
A simple “visual ladder” for unit price comparisons
Think of unit prices as a ladder where lower is better, and your job is to place each option on that ladder, then choose the lowest rung that still meets your standards.
When the ladder difference is huge, the decision is easy, and when the rungs are close, you let quality and real usage decide without feeling like you are missing a hidden deal.
- Big gap: choose the lower unit price, because the savings are meaningful and repeatable.
- Small gap: consider quality, because enjoyment and performance may matter more than a tiny per-unit difference.
- Tie: choose based on what prevents waste and fits your routine, because routine alignment creates the most consistent long-term savings.
How to build a personal “normal range” for your staples
A powerful trick is memorizing a rough normal unit price range for your most common items, because that gives you instant context when you see a sale, a shortage, or a sudden price jump.
Once you know your normal price per ounce for coffee or your normal cost per load for detergent, you can spot a great deal immediately without doing full math every time.
- Choose five staples you buy often, such as rice, pasta, eggs, coffee, and detergent, and record the unit prices you usually see for the version you like.
- Use that range as your reference, so you can tell whether a promotion is genuinely better than normal or just noise.
- Update the range occasionally, because prices change, and your goal is realistic savings, not chasing a past number that no longer exists.
Special situations where unit pricing needs a smarter twist
Some aisles demand an extra step, because the unit that matters is not always the printed unit, and the “best deal” depends on how the product behaves, not only how much of it exists in the package.
Recognizing these situations makes you feel confident, because you stop forcing the wrong comparison and start choosing the metric that matches real value.
Concentrates, mixes, and products that expand
Broth concentrate, drink mixes, and condensed products can look expensive per ounce, yet they produce many servings after dilution, so cost per prepared serving is a better value comparison than sticker price or raw weight alone.
When the package states how many servings or gallons it makes, use that number as your unit, because it reflects the real output your household uses.
- For drink mix: compute cost per prepared ounce or per glass, because that captures the true number of servings created.
- For concentrates: compute cost per prepared cup, because that matches how you cook and portion meals.
- For baking mixes: compute cost per batch, because a “bigger” box does not matter if it makes fewer usable batches.
Fresh produce where quality changes day to day
Produce requires balancing math with freshness, because a cheap price per pound is not a deal if the items are bruised or will spoil before you can eat them, while a slightly higher unit price can be smarter when quality is visibly better.
Your best unit is sometimes “edible, enjoyable portion,” so choose what you will actually eat, then use unit price as the guide inside that quality boundary.
- Pick quality first within reason, because poor quality increases waste and reduces the value you actually get from your spend.
- Compare unit prices among the acceptable-quality options, because that keeps your decision grounded in both enjoyment and budget logic.
- Buy the quantity you can finish, because the lowest cost per pound does not matter when half the produce ends up composted.
“Convenience formats” like pre-cut, single-serve, and ready-to-eat
Convenience formats often carry a higher unit price, yet that premium can be worth it when it prevents takeout spending, reduces prep time stress, or increases the chance you actually eat the healthy option you bought.
A fair value comparison asks, “Does this format change what I will realistically do,” because real savings come from behavior, not only from labels.
- Pre-cut produce can cost more per ounce, yet it may reduce waste if you consistently use it instead of letting whole produce rot.
- Single-serve packs can cost more per ounce, yet they can prevent overeating or food waste when portion control matters to you.
- Ready-to-eat options can cost more per ounce, yet they can replace expensive alternatives, turning “higher unit price” into “lower total spending.”
A practical mini-workshop: do three comparisons and feel the difference
Practice makes unit pricing feel natural, because once you have done a few comparisons, your brain starts seeing the shelf through a new lens where value is obvious and sticker price loses its power.
Try these three quick exercises the next time you shop, and notice how quickly confidence replaces doubt when you have a clear method.
- Pick two sizes of the same product, calculate price per ounce for both, and choose based on the lowest unit price that you will realistically finish.
- Compare two different brands with similar ingredients, use unit price labels as the baseline, and break ties using flavor, nutrition needs, and your household’s preferences.
- Evaluate a promotion, compute the effective unit price under the required conditions, and decide whether the deal improves your normal unit price range enough to justify extra quantity.
After a few runs, you will notice a calm shift, because you stop feeling like you are guessing, and you start feeling like you are simply reading the shelf correctly.
That calm is the hidden benefit of unit pricing, since it reduces decision fatigue and makes your shopping trips faster, clearer, and more consistent.
Conclusion: the best value is the one you will actually use
Comparing unit prices at stores is the simplest way to stop overpaying for smaller packages, confusing branding, and flashy promotions, because unit pricing turns every shelf into a clear apples-to-apples comparison.
Once unit price labels become your first glance, grocery savings stop being occasional luck and start becoming a repeatable outcome you can count on month after month.
Quality, taste, performance, and realistic usage still matter, so the goal is not to always buy the biggest size, but to buy the best value for your real life, your real pantry, and your real routine.
Notice: this content is independent and has no affiliation, sponsorship, or control over any stores, brands, apps, or third parties mentioned.